Create a mini UI with the ESMF JavaScript SDK
In this section you will get in touch with the ESMF JavaScript SDK. The aspect model loader and schematics node modules will help you to build UI elements to visualize the aspects of your digital twins.
You will learn:
-
How to generate a table based on your Aspect Model.
-
How to fill the table on the UI with live data retrieved from an aspect implementation.
Create an Angular project
Let’s start with installing the Angular framework, version 14.
npm install -g @angular/cli@14
With the next command, you will create a default Angular project.
ng new demoUI
Navigate to the new project and run the command to install the missing node packages.
npm install
Once the installation is successful, check what Angular has created.
Start the local web server with the following command.
npm run start
Upon success, you get a hint on which port the server is active.
Open the link http://localhost:4200/ in a browser of your choice, and you will see a first page, which we will modify in the course of the next steps.
Install Angular schematics and the ESMF schematics
Use the following command to get the Angular schematics version 14 installed.
npm install -g @angular-devkit/schematics-cli@14
Add manually following the compiler options in the file
<your-local-directory>/demoUI/tsconfig.json.
{
"resolveJsonModule": true,
"esModuleInterop": true,
"allowSyntheticDefaultImports": true
}
Use the following command to get the ESMF schematics version 2.1.0 installed.
npm install https://github.com/eclipse-esmf/esmf-sdk-js-schematics/releases/download/v2.1.0/esmf-semantic-ui-schematics-2.1.0.tgz
| The ESMF schematics project will additionally use the ESMF aspect loader under the hood, so you don’t need to install it separately. |
Add an Aspect Model to the project
At this point you can add an Aspect Model to the project and use the toolset installed to create valid JavaScript table elements out of it.
We recommend to create a folder called aspects. Add the Movement.ttl file to this folder.
Now, the specifics module can easily detect it at:
demoUI/aspects/Movement.ttl.
Generate table fields
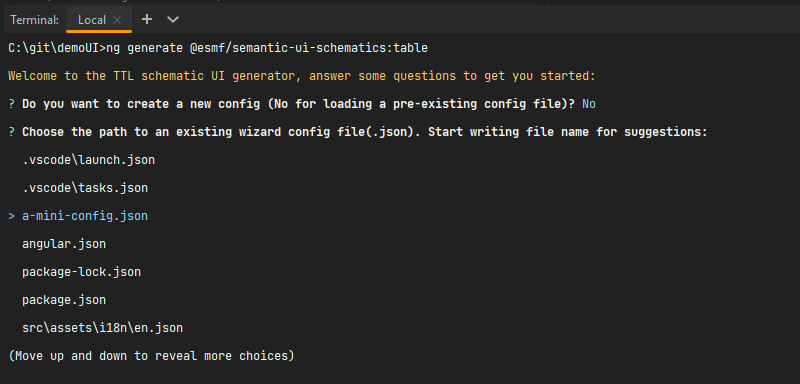
With the next command you would get a dialog with multiple options to answer,
for example, regarding styling, i18n, and which elements from the ttl structure should be prepared for the table.
All decisions would then be stored in a file located at top level, such as "demoUI/wizard-config.json".
ng generate @esmf/semantic-ui-schematics:table
However, for the sake of simplicity, download this file a-mini-config.json which already contains a minimal set of options to the project root.
Now, run the wizard with the command from above, and select this file.
{
  "aspectModelTFiles": [
    "aspects\\Movement.ttl"
  ],
  "excludedProperties": [],
  "configFile": "wizard-config.json",
  "complexProps": [
    {
      "prop": "position",
      "entityUrn": "urn:samm:org.eclipse.esmf.examples.movement:1.0.0#SpatialPosition",
      "propsToShow": [
        {
          "name": "latitude",
          "aspectModelUrn": "urn:samm:org.eclipse.esmf.examples.movement:1.0.0#latitude"
        },
        {
          "name": "longitude",
          "aspectModelUrn": "urn:samm:org.eclipse.esmf.examples.movement:1.0.0#longitude"
        },
        {
          "name": "altitude",
          "aspectModelUrn": "urn:samm:org.eclipse.esmf.examples.movement:1.0.0#altitude"
        }
      ]
    }
  ],
  "selectedModelElementUrn": "urn:samm:org.eclipse.esmf.examples.movement:1.0.0#Movement",
  "jsonAccessPath": "",
  "getExcludedPropLabels": true,
  "defaultSortingCol": "isMoving",
  "customColumns": [],
  "addRowCheckboxes": true,
  "customRowActions": [],
  "addCommandBar": true,
  "enabledCommandBarFunctions": [
    "addCustomCommandBarActions"
  ],
  "customCommandBarActions": [],
  "enableRemoteDataHandling": true,
  "customRemoteService": true,
  "enableVersionSupport": false,
  "customStyleImports": [],
  "overwrite": true
}
Now run the command
ng generate @esmf/semantic-ui-schematics:table
and answer the first question with No, then use your down-key to select the config.
Upon success, you can find a bunch of new files created at
demoUI/src/app/shared/components/movement-table/movement-table.service.ts
and the types at
demoUI/src/app/shared/types/movement/movement.types.ts
Generate description fields and tooltips
With the next commands, you prepare the UI for internationalization.
ng generate @esmf/semantic-ui-schematics:i18n
npm run combine-i18n
The Movement.ttl only holds English text. Therefore, only one text file will be prepared.
See the results in
src/assets/i18n/shared/components/movement-table/en.movement-table.translation.json
and the English version is compiled in
src/assets/i18n/en.json.
Adjust the app to show your table
Now, add the following HTML snippet on top of the src/app/app.component.html file.
  <h1>Welcome to Bosch Semantic Stack</h1>
  <p>This is your table generated out of the Movement.ttl</p>
  <div>
  <rbs-ui-movement-table></rbs-ui-movement-table>
  </div>
  <p></p>
  <hr>
Open http://localhost:4200/ in a browser to preview your work.
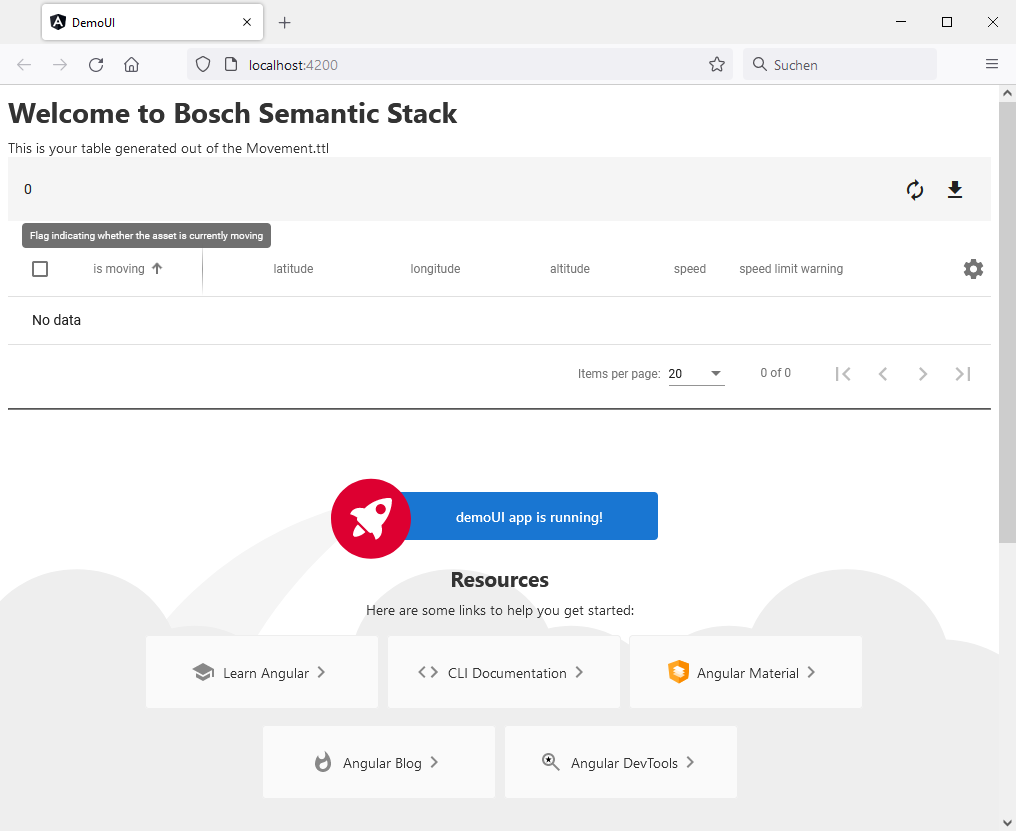
As you see, the table is created automatically and uses table headers and tooltips from the Aspect Model Movement.ttl.
Adjust the app to show live data in the table
Fill the table value with a GET request.
Adjust the following HTML snippet on top of the src/app/app.component.html file.
 <rbs-ui-movement-table remoteAPI="https://demo.bosch-semantic-stack.com/api/movement">
     </rbs-ui-movement-table>
Check your results
In case your local HTTP server stopped meanwhile, restart it with
npm run start
Open your browser on http://localhost:4200/
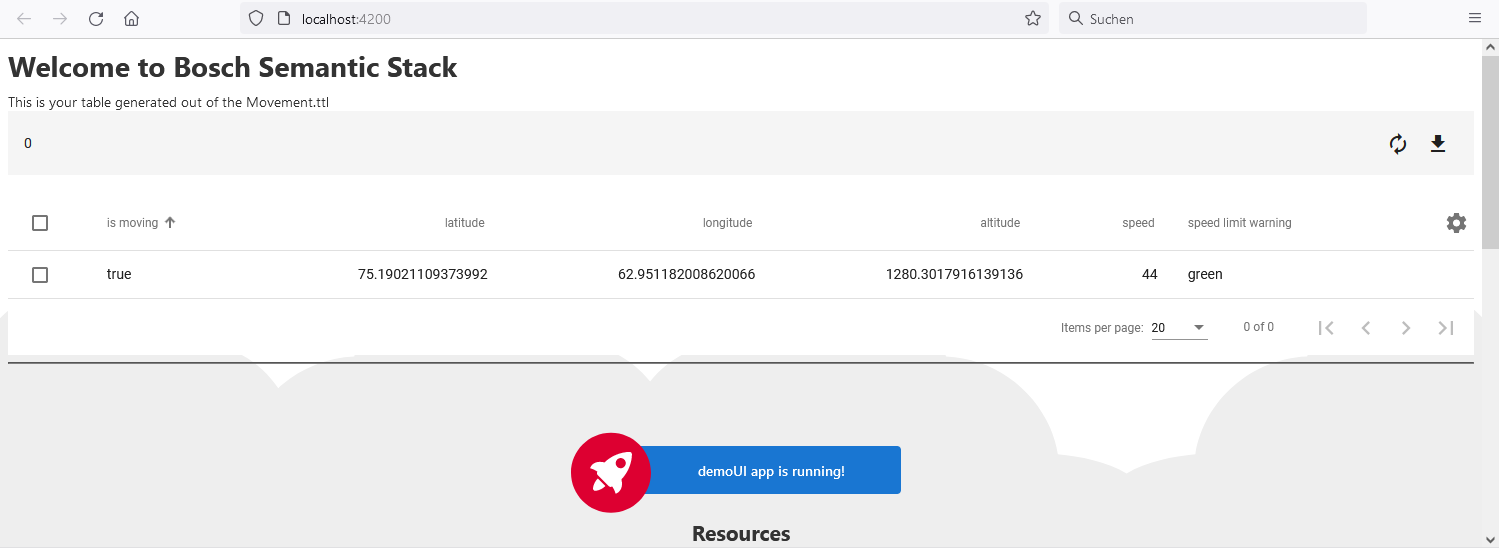
Congratulations,
you have successfully created a small UI simulating a solution which displays the movement data of a digital twin.